Tuesday, June 30, 2009

Celebrity Mom?

My older son has been reading my blog with interest. Reminding me about dishes that are popular in our household, ones that I should necessarily post, helping with the pictures, edits, vishesh tippani etc.

I have a small party coming up and it is my son's idea that I should use it as an occasion to launch my blog quite like a book launch. I think since I started blogging I have grown several notches in his esteem and probably enjoy the same status as other celebrity authors ( I am not complaining about the larger than life persona, I know it is shortlived). He further suggests that it would be only appropriate to therefore make dishes that have been posted on the blog. Hmm! posts have so far been in no particular order: some favorites, some others that I have reminisced about.

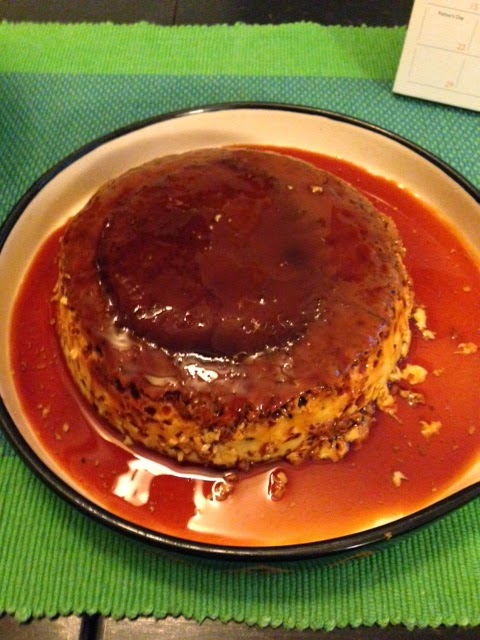
If I were to stay with the dishes that have already appeared, they don't quite go together as a meal and if I start uploading new ones now it will take quite a while- busy week/some travel looks tough. Okay, maybe I shall make Caramel Pudding from the blog, for dessert( nobody makes them these days; replaced by apple pies, syrupy sweets, icecreams etc.), that would be quite different( especially since I have never made it as dessert when we have entertained). That takes care of one course. I usually like to try out at least a couple of new dishes when I invite people over. Adds to the fun and excietment. My favorites are starters( close to 80% of the time is spent eating them so high share of mind space), a little twist here, a little tweak there and Voila! completely new stuff. Never get me started on starters, I could just go on. But for now let me focus on the main course. I had planned to keep it simple( not slog hours in the kitchen over it), low oil and interesting. A one dish meal is what immediately comes to mind but not Biryani please( has almost become a constant at every large party I have been to, too heavy to be consumed close to midnight and my husband would not agree to the poultry version- if it is Biryani it has to be mutton only, my father felt the same way too) so maybe Kauswey.

Kauswey(a Burmese dish) seems to fit the bill, it is a one dish meal( easy to upload, my son would be happy), no oil( at least that is the version I make), interesting as a concept( takes away from the fact that you have made just one dish- tops my cheat sheet). I had first sampled Kauswey close to 15 years back at a Bong married to a Parsi friend's place. I liked the concept of a DIY main course, customised to your palate. I vividly remember that lunch session, we had finished the meal with Mango Gateux( probably the best I have had till date, light, fluffy and lip smackingly delicious).

Years later I chanced upon the dish in a recipe book on Lean Cuisine. Most people I know like Kauswey( even the name and especially the way you roll your tongue as you say the word has an exotic feel to it). If not the taste the concept definitely appeals. As the host it allows you to ready most of the stuff earlier ( no last minute frying, stirring etc.) and leaves you free to mingle with the guests/focus on the starters.

Kauswey( Burmese Chicken Curry with Noodles)
Ingredients
1 kg Boneless Chicken(ideally breast piece) chopped into really small pieces- that way they cook much faster and blend better with the gravy/noodles
1 tbsp garlic( finely chopped, roughly about 5/6 large pods)
3 medium sized onions, finely chopped
1 tbsp ginger, finely chopped
1 tsp cumin powder
1 tsp coriander powder( for a better flavor roast coriander seeds and then grind them)
4 tbsp tomato puree( blanch and puree the tomatoes)
1.5 cups water
1.2 tsp chilli powder or paste( de-seed the chilis and grind them to a paste)
Salt to taste, about 2tsp
2 cups thin coconut milk
2 cups thick coconut milk
500 gms thin egg noodles

Method


  • Grind the ginger, garlic, onion, cumin, corriander with a little water to a fine paste.
  • In a pan put the ground masala along with tomato puree and 1 cup water.
  • Bring to boil and then simmer till the masala is cooked.
  • Add the chicken and let the masala coat the chicken.
  • Add the chilli powder/paste, salt and thin coconut milk and simmer till the chicken is tender( this should take about 10 minutes).
  • Add the thick coconut milk and check seasoning.

To serve( this is my favorite part, makes this dish really unusual and interesting)

Serve boiled noodles in soup plates/bowls, pour the Kauswe over it and let the guests choose their topping.

By the way during a recent trip to Delhi I noticed that Paneer Bhandars( and I am told vegetables shops too) are selling read to eat noodles( as in pre-boiled). Momos as selling like hot cakes with counters across the city, replacing good old Chaat/Tikki joints. The Chinese sure are taking over in more ways than one.

Accompaniments could include: fried onion flakes, fried garlic flakes, chopped green chillies, chilli flakes, hard boiled eggs( quartered), lemon wedges, finely chopped spring onion, finely chopped green corriander, finely chopped cucumber(de-seeded), barik sev( yes, the same one that is used for sev puri) and some garlic chilli paste. Use some or all of them.

I hope my guests like it. Watch this space for an update. Now for the starters. Hmm! Maybe Mango Mayonnaise with some interesting cold cuts, Mexican grilled chicken with a mustard dip.......

Sunday, June 28, 2009

Dizzy Pazzy


During my growing up years desserts were a regular at dinner. Well, not the exotic types typically a custard with lots of fruits, kheer( sooji, semiya, chuda, chawal) or pudding. We ( me and my siblings ) would at the beginning of the meal ask: What's for Dizzy Pazzy? Dizzy Pazzy was our way of referring to the dessert. My sister with the sweetest tooth among us would very often skip the main course to save some of her appetite for the dessert. Dizzy Pazzy, can't recall how the term originated, you know how families have their own jokes, language codes etc. We still use quite of bit of that in our regular conversations much to the disgust of our spouses. Typically these references are followed by giggles and laughter which annoys them even further.
Coming back to the dessert. I did not have any particular favorite then. In fact I was not much of a dessert person, I loved the imlis, achars and khattai a lot more. Kheers were okay, custard tasted nice when it was chilled, puddings could range from being really good to terrible. There were days when the puddings would be just right: soft to touch, even textured, firm enough to be cut into individual portions and with a predominant vanilla flavor. Then there were other times when the pudding would have an eggy smell, the texture would be uneven( probably the egg had been added to hot milk) and would have a kind of semi-solid consistency.

Once I got married and set up home I did not make pudding, was not quite sure how to. When we dined out I would occasionally sample some. I love the way they plate the pudding with a wee bit of cream and a cherry on top.

And then quite recently my husband's aunt shared her Caramel Pudding recipe with me.Since then it is a regular on my menu. My sons otherwise reluctant egg eaters love the pudding and I see it as a good way to slip in the eggs into their diet. As for me I try and stay away from desserts now with Woh Bachpan ki yadein.

Caramel Pudding

Ingredients
Milk: 3 cups
Sugar: 4 to 5 tsps( If you prefer your desserts really sweet you could add a few more tsps)
Eggs: 2
Vanilla Essence: 1 tsp
2 tsps sugar to caramelise

Method
  • Heat the milk and reduce to 2.5 cups. This should take about 10/15 minutes.


  • Remove from fire and cool, then add the sugar and mix well.


  • Beat the eggs with Vanilla essence to a fluffy consistency. Add to the milk.


  • Next take the container in which you are going to pressure cook the pudding. I use a small steel one. Put 2 tsps of sugar into this container and caramelise it( place it on the stove and keep stirring on high flame till the sugar turns a rich brown colour). Turn the container around so that the sugar coats the base of the container evenly. Let it cool.


  • Pour the milk and egg mixture in..


  • Pressure cook without the whistle for about 11 minutes.


  • Remove, let it cool and then refrigerate.


  • To serve loosen from the sides and turn it over on a plate. Cut into individual slices and serve.


My children love it as an after school snack, in between meals. Rarely had as Dizzy Pazzy though. Sigh!

Bon Apetit and Happy Cooking!

Thursday, June 25, 2009

Cookery shows are therapeutic...


I just love poring over recipe books,watching cookery shows and reading food blogs . Basically anything to do with food excites. Never fails to lift up my spirits, like Maria I simply remember my favorite things and then I don't feel so sad. Very often as I am reading through recipes I can almost visualise the dish, smell the flavor and even taste the dish. Many of the recipes( especially on Blogs) sound familiar and tend to be low on " new news" but what truly delights are the food stories, the passion of the narrator/the chef . The fact that they all love good food goes without saying. As I watch, read, surf I feel a strange sense of bonding with all those unknown humans, we are kinda connected through food.

During one such show I watched a famous chef prepare Dhuli Urad ki Daal. Dhuli Urad is used only to make Dahi vadas in my house so the title of the dish got me interested. Also reminded me of a dear friend who years back had commented : "You Easterners treat the 'daal' as a sidekick, something that is around but nobody pays much attention to( she went on to marry a Bengali but that is another story, some other time)". True, we could never quite understand how Punjabi's salivate over a meal of Rajma Chawal, I mean I too likeove Rajma but 'age bhi to bolo na', what else with it?

I have come a long way( gastroniomically for sure) and today enjoy a simple meal of freshly made garma garam rotis with a basic daal. So daals do occupy center stage now and my friend( if she is reading this blog) would be amused.

I reproduce a leaner version of Dhuli Urad Ki Daal. I particularly liked the bit about cooking it in milk( which is so unusual) and simmering/dum cooking it on low flame. Also most Daal preparations that I am familiar with are watery in their consistency, this one is a dry dish and is quite like the 'daal puri(kachori) stuffing'. Takes longer than regular Daal( which you just pressure cook and lagao tadka) but is flavorsome and delicious to taste.

Dhuli Urad ki Daal

Ingredients

Dhuli Urad Daal: 200 grams
2 tbsp oil ( or ghee if you are not the types to worry about clogged arteries)
1 tsp turmeric powder
1 tsp red chilli powder( if serving it to children I would suggest use 1/2 tsp)
2 cups milk( toned milk will do just fine)
1 tsp cumin seeds
3 whole red chillies
10 cloves chopped garlic
1 tsp finely chopped ginger
1 thinly sliced onion
1 tbsp corriander
Salt to taste

Method

  • Soak the Urad daal in water for 15/20 minutes

  • Heat 1 tbsp of the oil in a non-stick pan and add the daal, fry for a few minutes.

  • Next, add turmeric powder, chilli powder, salt, half a cup of water and mix well. Let it simmer for a few minutes.

  • Add the milk and let the daal cook on low flame for close to 30 minutes. Remove from stove.

  • Heat the remaining oil and add cumin seeds, once they sputter add red chillies, garlic, ginger and onion and saute for a few minutes. Add the tadka to the daal .

  • Garnish with freshly chopped corriander leaves and serve hot with chappati

This takes a long time to cook but the colour, aroma and finally the taste make it worth the wait.


Healthy Keema?


My husband loves meat in any form/type. However now that we are both ahem! not so young I go a little easy on the red variety.

There had been a packet of Keema lying in the deep freezer for a couple of weeks now. I was toying with making something different/special for lunch today as I had just got back from a trip( distance always makes the heart grow fonder) and my husband was joining me for lunch( rare privileges). But I was in a Catch 22 situation really: guilty if I cooked and guilty if I did not. Settled for something in between. Decided to make the Keema afterall( the way to a man's heart is through his stomach) but with soya granules. And the best part is that it did taste like regular Keema( my husband won't get to know till he reads this blog) . So here I present

Keema Matar with Soya

This one serves 6 adults. Best served with Roti and other side dishes so that you restrict the quantity of meat.

Ingredients

Keema: 250 grams
Green Peas: one cup( I use Safal frozen peas, if adding fresh peas needs to added earlier during the cooking)
Potatoes: 2 medium sized ones, finely chopped
Tomatoes: 2 finely chopped
Ginger paste: 1 tsp
Garlic paste: 1 tsp
Cumin powder: 1 tsp
Corriander powder: 1 tsp
Red Chilli paste: 1 tsp( soak red chillies, de-seed them and then grind to a fine paste, ideally make this in large quantity and freeze as individually portions, gives the dish a rich red colour)
Fresh Green Corriander, finely chopped: 1 tsp for the garnish
Finely chopped green chillies: 1 tsp for the garnish
Salt: To taste( I used about 1.5 tsp
Milk: 1 cup
Oil: 1 tbsp( I used mustard oil but a Sunflower oil will do just fine)
Pinch of sugar
Bay leaves: 1/2
Garam Masala: 1/2 tsp( I typically add only freshly ground cinnamon powder)

Method

Soak the soya granules in milk for about 10/15 minutes. Ideally soak them and then start your cooking(helps soften the granules and gets rid of the soya smell), you could also try soaking the granules in Kesar milk for an even nicer flavor.

Heat oil in a non-stick cookware. If using mustard oil then allow the oil to smoke. Add a pinch of sugar and let it caramalise( adds colour to the dish).
Next add the finely chopped onion and brown it on high flame.
Once the onions have browned add ginger garlic paste, red chilli paste, cumin powder, corriander powder and saute for a few minutes. This will take close to ten minutes( don't rush through this step, need to ensure that the raw smell of ginger/garlic is no longer there and the oil should separate).
Add the keema, tomato and salt and cook on high flame for 10/ 15 minutes.
Squeeze out the milk from the soya granules and the granules to the keema. Keep stirring so that the two are well blended. Next add the potatoes, green peas, bay leaves, garam masla and pressure cook for one whistle.

One the pressure cooker cools down, open and dry the water( should be mosit but no water should be present), transfer to a serving dish, garnish with freshly chopped green chillies and corriander.

Serve hot with Roti, Daal and a raita or salad

Optional: You can also add finely grated carrot.

This dish can be the base for any mince based dish like Moussaka, Shepherd's pie, Keema Pulao etc.

Sunday, June 21, 2009

Traditional Mutton Curry

For years I cooked mutton the same way as I cooked Chicken and with dismal results. My husband kept saying that it was not as good as the mutton he had as a child/young adult at his aunt's place. Finally I got his aunt to part with her recipe and have managed to recreate the same taste that my husband has been so used to.
Ingredients
Mutton( Goat Meat): 1 kg
Onions: 4 medium sized, finely chopped
Tomatoes: 2, finely chopped
Potatoes: 4 medium sized ones, peeled and halved( we always cook our mutton with potato, the potato soaks up the oil and masala and tastes good, the leftover potato and gravy tastes good the next day with chappatis/parathas, the mutton sadly does not last beyond one meal)
Garlic: 1 large( 10/ 12 large pods)
Ginger: 2 inches
Whole Jeera( Cumin): 1 tsp
Whole Dhania( Corriander): 1 tsp
Dry Red Chillies: 6/7( the curry gets its fiery colour and taste from the chillies)
Haldi (turmeric) powder: 1/2 tsp
Cinnamon : 1 inch stick
Green cardamom: 3/4
Bay leaves: 2/3
Mustard Oil: 4/5 tbsps( tastes best if cooked in mustard oil however if you don't like the taste/smell of mustard oil you could substitute with a refined Sunflower or Saff flower oil)
Sugar: a pinch/1/2 tsp
Salt to taste

Method
  • Grind the ginger, garlic, cumin and corriander seeds with a little bit of water to a fine paste.
  • Soak the red chillies for about 30 minutes in water, de-seed and grind separately to a fine paste( I usually make this in larger quantity as it is difficult to grind a little bit of chilli, freeze the rest for later use)
  • Heat mustard oil in a pan and allow it to smoke, this will take a couple of minutes, add a pinch of sugar and let the sugar brown/caremalise
  • Add the onions and let them brown on high flame, next add the haldi and red chilli paste and stir constantly.
  • Next add the ginger- garlic paste and keep bhunoing the paste on high flame for about 10/15 minutes. You could add a little water from time to time to prevent the masala from getting burnt.
  • Add the mutton, tomato and salt and continue the process for the next 15/20 minutes till the oil separates.
  • Add the cinnamon, green cadamom, potato and saute for a few more minutes.
  • Transfer into a pressure cooker, add water( enough to cover the mutton pieces) and pressure cook for 20 minutes.
  • Garnish with fresh corriander and serve hot.

Goes best with plain rice, a tomato onion salad/raita. Don't bother making side-dishes as they would remain untouched. Best had for lunch.

We all scream for Icecream...

Remember that little rhyme we learnt in school, I scream you scream we all scream for Iceccream. I think we can all vividly recall our initial icecream experiences, the ice gola man Mama banned us from, the attempts at making icecream at home with malai and sugar, graduating to the Kwality, Walls, Baskin Robbins, Hagen Dias etc. BUT " home made icecream" in this day and age, typically my guests wonder aloud(no, not because they think it requires great skill to make icecream but because they are wondering why not just buy them off the shelf)Aren't there enough ready to eat ice-creams already? Who makes icecreams at home these days? I do and I think homemade icecreams retain that fresh fruit flavor. I tried the strawberry version at my cousin's place( her MIL's recipe) years ago on a hot summer day and loved it. Since then I have made it with almost all fruits available. Make sure the fruit you choose is fleshy and sweet.

Natural Ice Cream( This serves just about 4 adults)
Ingredients
Fruit Pulp: 1 cup( Mango/Strawberry/Chikoo/Litchie/Guava/Kiwi)
Cream: 1 cup( if using malai add a little more)
Sugar: 3/4 th to 1 cup( depending on how sweet the fruit is and how sweet you would like your icecream)
Milk powder: 1 cup
Milk: 1 cup

Method

  • Mix all the ingredients together and run it in the mixie for a couple of minutes
  • Freeze for 12 hours
  • Serve topped with chopped fruits
This takes a little long to set so make it the afternoon before if planning to serve it for lunch and early in the morning if planning to serve it for dinner.
If planning to make in larger quantities, do not double/tripple the ingredients( you could go wrong on the sweetness as milk powder also contains sugar), my suggestion is that you make it in separate lots( would also be easier to serve as children typically eat first and then the adults).
Make large quantities as most people( even adults) would go in for second/third helping.
Icecream is also referred to as the 5 cup icecream.

Something about Doi


When we moved to Chennai from Kolkata what we really missed were the "milk based desserts". This recipe was passed on to me by a Bengali Friend who had spent many years in Europe in the late 80's when Indian food and especially Indian desserts were neither popular nor easily available. Bhapa Doi for her( and countless others like her) thus served as a convenient, easy to prepare, authentic Bengali dessert. I have since being passed on the recipe made it umpteen times, tried variations of it( including a Bhapa Doi Cheese Cake) and passed it on to several other happy chefs. This one is a never fail recipe and would Wow! your guests for sure.

Bhapa Doi
Ingredients
Set Dahi/curd: 400 grams
Condensed milk: 400 grams/1 tin( if you don't like it very sweet then use only 3/4 th of the tin)
Raisins: 10/12(optional)

Method

  • Mix the curd and condensed milk together, add the raisins.
  • Bake on a double boiler( 140 degree centigrade) for 1 hour. I am told you can also do this on the microwave( 6 minutes on low power).
  • Cool and serve chilled
I usually serve it with seasonal fresh fruits, goes best with mango. Looks best with strawberry( in fact strawberry offsets the sweet taste of Bhapa Doi).
High on calorie but delicious to taste. Mmmm!
Watch out this space for the recipe of Mishti Doi, WIP currently.


Stir Fry Veggies


Ingredients
Carrots: 2/3 medium sized carrots, chopped into 1 inch sticks
Beans: a fistfull, chopped 1 inch long
Green Peas: 1/2 cup
American Sweet Corn: 1/2 cup
Mushroom: 1/2 cup, finely sliced
Spinach/Palak: 1 cup, finely chopped
Onion( my family likes loads of this, you could go easy on it): 2/3 medium sized ones, thinly sliced
Garlic: 4/5 large pods, finely chopped
Sesame Seeds: 1 tbsp, lightly roasted
Olive oil: 1 to 2 tbsps
Oregano: 1 tsp
Salt to taste

Method
  • Blanch the carrots, beans and green peas
  • Heat the non-stick pan, add the olive oil. Once the oil is hot add the garlic and saute for a few minutes, next add the onions and fry till glassy. Add the rest of the veggies( except Spinach) and keep cooking on high flame
  • Once the veggies are done, add the spinach and lightly toss the veggies around
  • Add oregano and sesame seeds
  • Mix well
  • Serve hot

Yan can cook

Have been meaning to start writing a food blog. I am told by the more experienced ones who have now been blogging for a while that getting started is the most difficult bit. My sister felt that my food blog would probably sound like the cookery show 'Yan can cook'. Remember the show in the early 90's where this Chinese chap would dish up some really simple stuff and the sign off line would be something along the lines of " If Yan can cook so can you". I too started off rather disastrously in the kitchen, managing to burn a fried egg, surviving on 'Cup-O- Noodles' for the first two weeks of married life etc. etc. My husband has enough stories to fill up our cocktail evenings.
However given my passion for food I was not willing to give up. Over the years I pored over recipe books, learnt from friends/relatives/Cookery show hosts, sometimes even having long chats on food with perfect strangers on trains/flights/restaurants and learnt first to cook then to experiment and finally innovate. A willing audience in the form of my husband( who has had to 'stomach' quite a bit) and now my older son helped. Would like to share some of my favorite recipes with other foodies. Also hoping that someday maybe my children will read about them, want to try out some of them.

Since I started my cooking with Noodles( never mind if it was the instant variety and all you had to do is pour hot water- those days I thought even that required skill- getting the quantity of water right, ensuring you kept it covered for the right time, mixed with a certain defteness so that the masala did not remain at the bottom but coated the noodles evenly) I thought I would dedicate the first post to something Chinesey.

Chinese Konji( recipe passed on to me by husband's aunt) is easy to cook, easy to digest and nutritious. Tastes delicious too.

Ingredients
Basmati Rice : 1 Cup
Chicken stock cube: 1 to 2
Finely chopped mixed vegetables ( I like beans, carrots, green peas and mushrooms, feel free to add what you like best): 1/2 cups
Shredded chicken: 1/2 cup
Can also add shrimps ( tried it once and went well with the dish).
Soya Sauce: 1/2 tsp per serving
Eggs: 1
Salt to taste

Method
  • Pressure cook the basmati rice with 5/ 6 cups of water and 1 stock cube. 6/7 whistles, should be a gooey gruel like consistency
  • Open the pressure cooker( add water if the consistency seems too thick), add the shredded chicken, prawns and vegetables and allow them to cook for a couple of minutes( should not take more than 2/3 minutes). Add salt to taste( remember to keep the salt low as soya sauce which is added finally is high on salt)
  • Add a well beaten egg, stirring continuously
  • Transfer into individual bowls, add a dash of Soya sauce
  • Serve hot

Best had on cold winter day or a rainy day. For my family this is comfort food. A one dish meal that is both wholesome as well as nutritious. Like an ad said " Fast to cook and good to eat".

For those of you on a diet this is a no oil dish and the quantity of rice being consumed per person is less than quarter cup so low carbs too.

This also goes well with a spicy chicken dish or stir fried vegetables (refer blog)